How We Built the Godforge Cinematic Using UE5, a Lean Team, and a design-first Workflow
Hey - this is a project we led. Safari was the creative director and handled most of the heavy lifting across all departments. I supported the original pitch and helped assemble the team. Along the way, we picked up a few new tricks and tools we’re excited to share. Let’s jump in.
So, You Wanna Make a Game Cinematic?
Godforge was our first project with the Fateless Games team, a cinematic to expand their game world, built by a small, focused team over 20 weeks.
We pulled together a lean crew of freelancers and partnered with a rigging and animation studio for final touch-ups. Some tools were familiar (Unreal, DaVinci, Substance), while others like: Magnific, Midjourney, WonderDynamics, and Topaz, helped accelerate some areas in the pipeline.
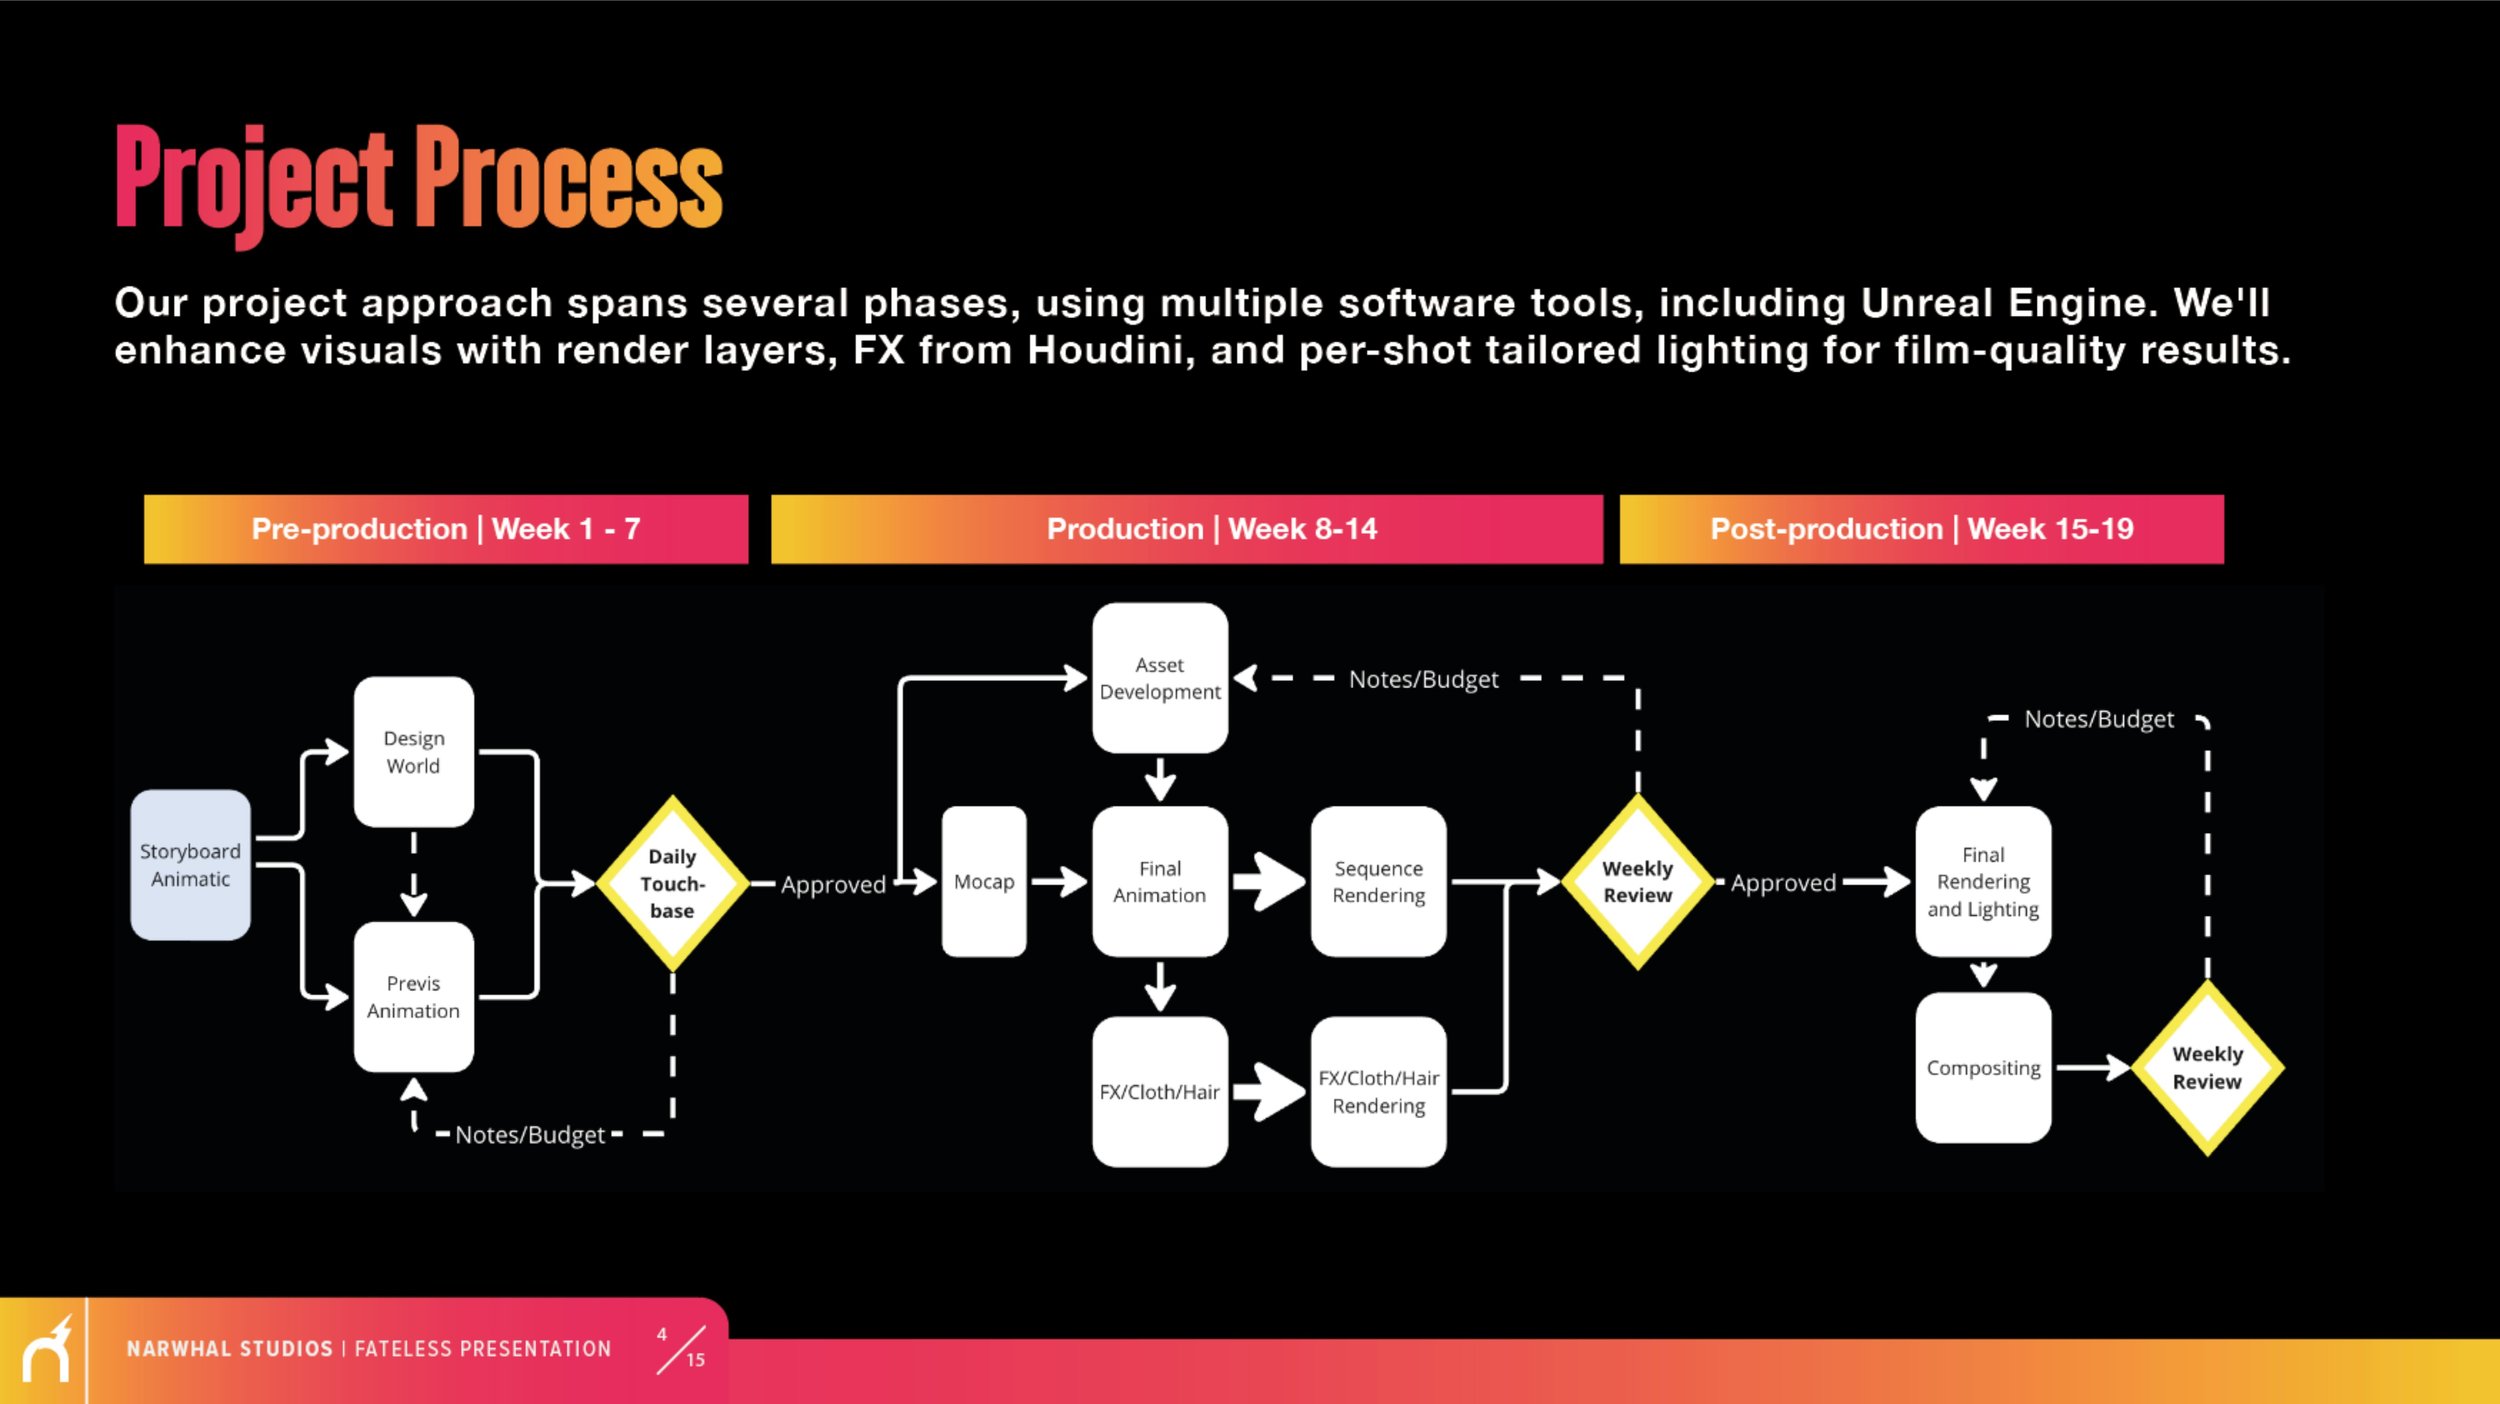
This article is for anyone looking to build a full cinematic in UE5 without a full in-house team. We’ll walk through what worked, what didn’t, and the shortcuts that actually helped. We started with the story first: a viz supervisor, art director, and Michael Berry (director) mapped out key beats and rough visuals, which gave us just enough to move into production and post.
Here’s what we’ll walk through in this article:
Table of Contents
Building the Team That Fit the Workflow
How We Found the Right People and Kept Things Moving


We built a small team of trusted freelancers, some familiar, others from our network, and partnered with a rigging and animation studio for final polish. Everyone had clear tasks, with tight comms through Miro, Discord, and daily check-ins.
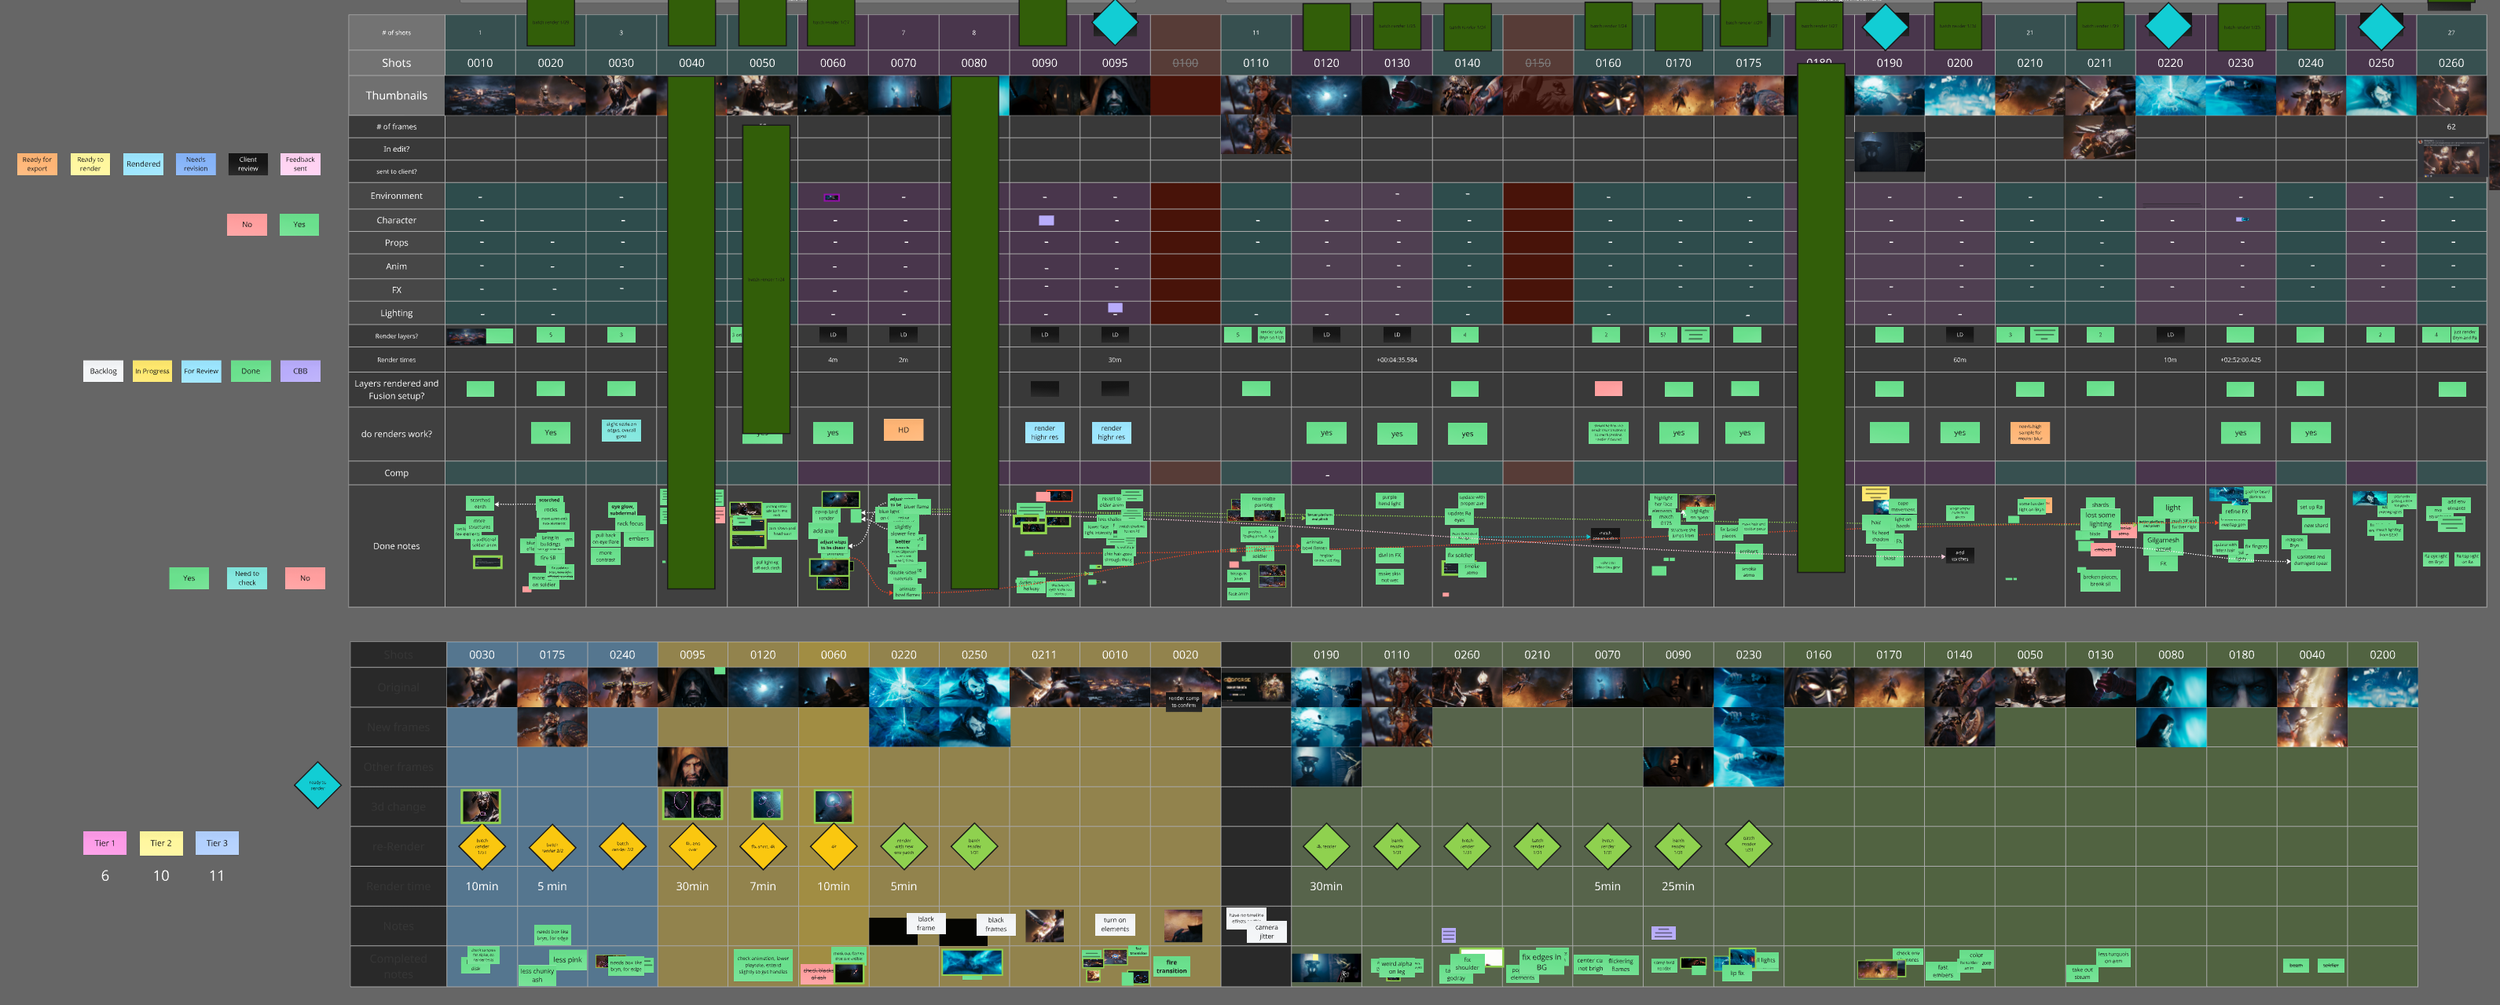
Miro was used for early planning and reference, then Ftrack took over as shot reviews ramped up. To keep Mike (director) in the loop, Safari built a visual Miro board showing real-time status and notes.
Our pitch stood out by blending filmmaking and game pipelines, offering regular feedback loops. With veterans like Jerry O’Flaherty and Mike Berry involved, we tailored the workflow to support their style.
Leading a Remote-First Cinematic Team


We picked teams based on creative and communication skills, everyone needed to stay tightly aligned. Even remotely, Safari (Creative Director) stayed in sync with Michael (Cinematic Director) like they were in the same room. That trust and visibility made it easy to pivot quickly and keep updates flowing daily.
Pre-Production & Viz – Designing to story
Before You Animate, Know Your Frames
Storyboards from the Fateless Games team we used to start the 3D storyboards and Animatic.
We kicked things off using storyboards provided by the Fateless Games team, which gave us a clear base to start blocking out 3D shots and building upon the animatic. Pre-production gave us creative alignment and technical clarity, helping the director lock tone and lensing early, and giving art direction just enough to build what was seen through the camera.
With a small team, the storyboards gave us a clear foundation to build up from, blocking out scenes and shaping the animatic in 3D. And with UE5, we could visualize quickly, find new shots, and turn around feedback overnight.
Working from Client Storyboards and Animatics
Very early previs, cut into an animatic.
Fateless Games developed storyboards and built an animatic with story rhythm, basic camera information, and mood via a temp track. An amazing starting point.
We use the storyboard animatic to pitch timelines and build our pitch around it. We didn't need to worry about what the story was going to say. We could focus on how we're going to tell it with a small team using visualization and moving through the entire process.
Building Early Previs and Blockouts
Maya scene with temp characters and shot setup
Previs Supervisor Mark Austin animated the 2D storyboard within Autodesk Maya and used temp rigs to block shots while final rigs were in progress. It let us start fast, matching storyboards, and evolve each shot from there.
This was the phase to try things, adjust lenses, slow down or speed up full-sequences, pose action and frame cameras. For the director and producers, it made the sequence predictable and let us plan and budget the production.
ai tools for concept exploration and look dev


While layout and previs were being created, Safari explored AI as a rapid sketch tool, painting over blockouts in Photoshop, then running them through Magnific for quick concepts. These passes helped align with the director on environments like the Chalice Room and Nordic battlefield, and even early character looks like with Brynhild.
They weren’t finals, but they sparked creative conversation and sped up approvals. We could turn around thoughtful iterations on a daily basis.
Viz Workflow from Layout to Tone Setting


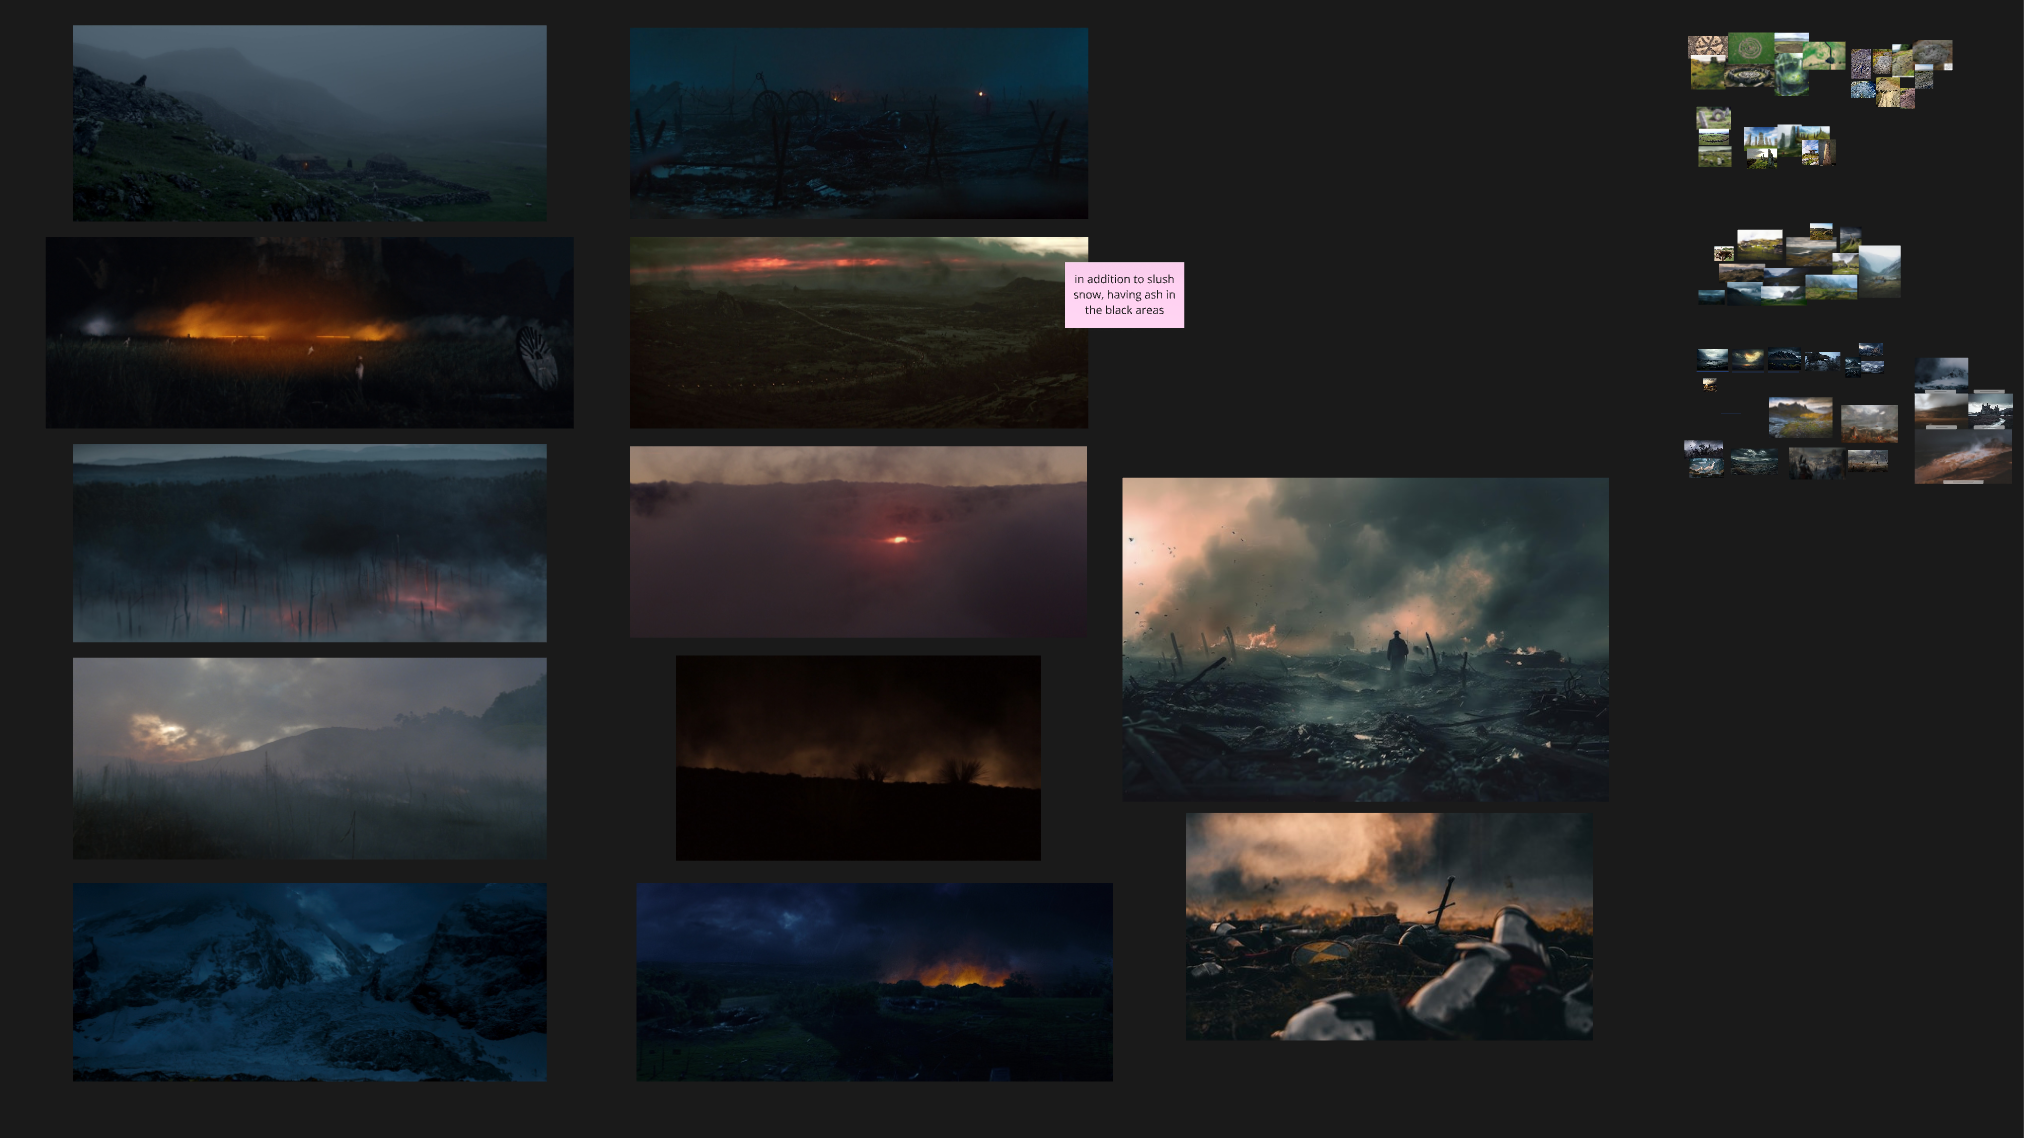

Once the early layout (blockouts) and AI-enhanced concept images were approved, the team used lighting references and color scripts to define the emotional tone of each shot. These visual choices stayed aligned with the original animatic but brought more clarity to atmosphere and mood.
By the end of this phase, every shot had a clear visual goal: how it should feel, where the light was coming from, and how it was framed. That gave the team a strong foundation to begin testing FX, and helped the cinematography feel intentional instead of generic.
With that visual direction in place, the team was able to move into final asset development with confidence, knowing the look and tone had been approved.
Asset Development – From Sketch to Screen
Turning Game Assets into Cinematic-Ready Shots
Top: Ra concept for proportion reference
Bottom: Adjusted game model
At this stage, we started upgrading assets for cinematic use, adjusting proportions, cleaning geometry, and sculpting expressions that could hold up in close-ups. Game models are often built for gameplay angles, but cinematic framing demanded more grounded forms and higher detail.
Ra’s proportions were adjusted to match his concept, taller, leaner, with refined armor. These changes had to happen before rigging to avoid animation issues. We brought in GimbalZen (Josh Axner’s studio) to handle Gilgamesh’s rig, hair, and topology cleanup.
Rebuilding vs. Refining: Where We Drew the Line
Refining Game Assets for the Close-Ups


For Brynhild, we kept more than we expected. The body and costume were solid, but the head needed a full re-sculpt. Her Metahuman face rig wasn’t expressive enough, so we sculpted key expressions manually for the hero shots.
Gilgamesh’s Cloak, Beard, and the Hand-Keyed Explosion


Gilgamesh needed custom rigging for his beard, hair, cloak, and hood. The chalice explosion beat was too specific for sims to handle cleanly, so GimbalZen hand-keyed the motion to match the director’s vision, giving us full control over how everything reacted in the shot.
Building Ra’s Glow in Comp


Ra was one of the toughest characters to get right. He needed to feel godlike, not just like a big soldier. Safari added a floating light source and subtle corona glow to give him a supernatural presence. The final look was polished in Davinci Resolve using light bloom and color correction to keep it grounded but otherworldly.
Sculpting Brynhild’s Battle Cry
Old expression (left), new sculpted version (right)
Brynhild’s battle cry shot needed a new facial mesh. The original rig couldn’t hit the emotion, so we sculpted expressions by hand and blended between them.
GimbalZen’s Hair Pass for Gilgamesh


GimbalZen handled Gilgamesh’s hair from start to finish. It needed to break with force and still hold in slow motion. Every tweak was reviewed in-camera with direct feedback from the director.
Blending Megascans with Matte Paintings


To finish the Nordic environment, we used Megascans to match the Scotland-meets-Iceland look. Snowy mountains from a Marketplace pack were later swapped for a high-res concept matte. For the background, Safari used the concept art directly as a matte painting, saving time by focusing only on what would be seen in camera.
Shaping the Chalice Room
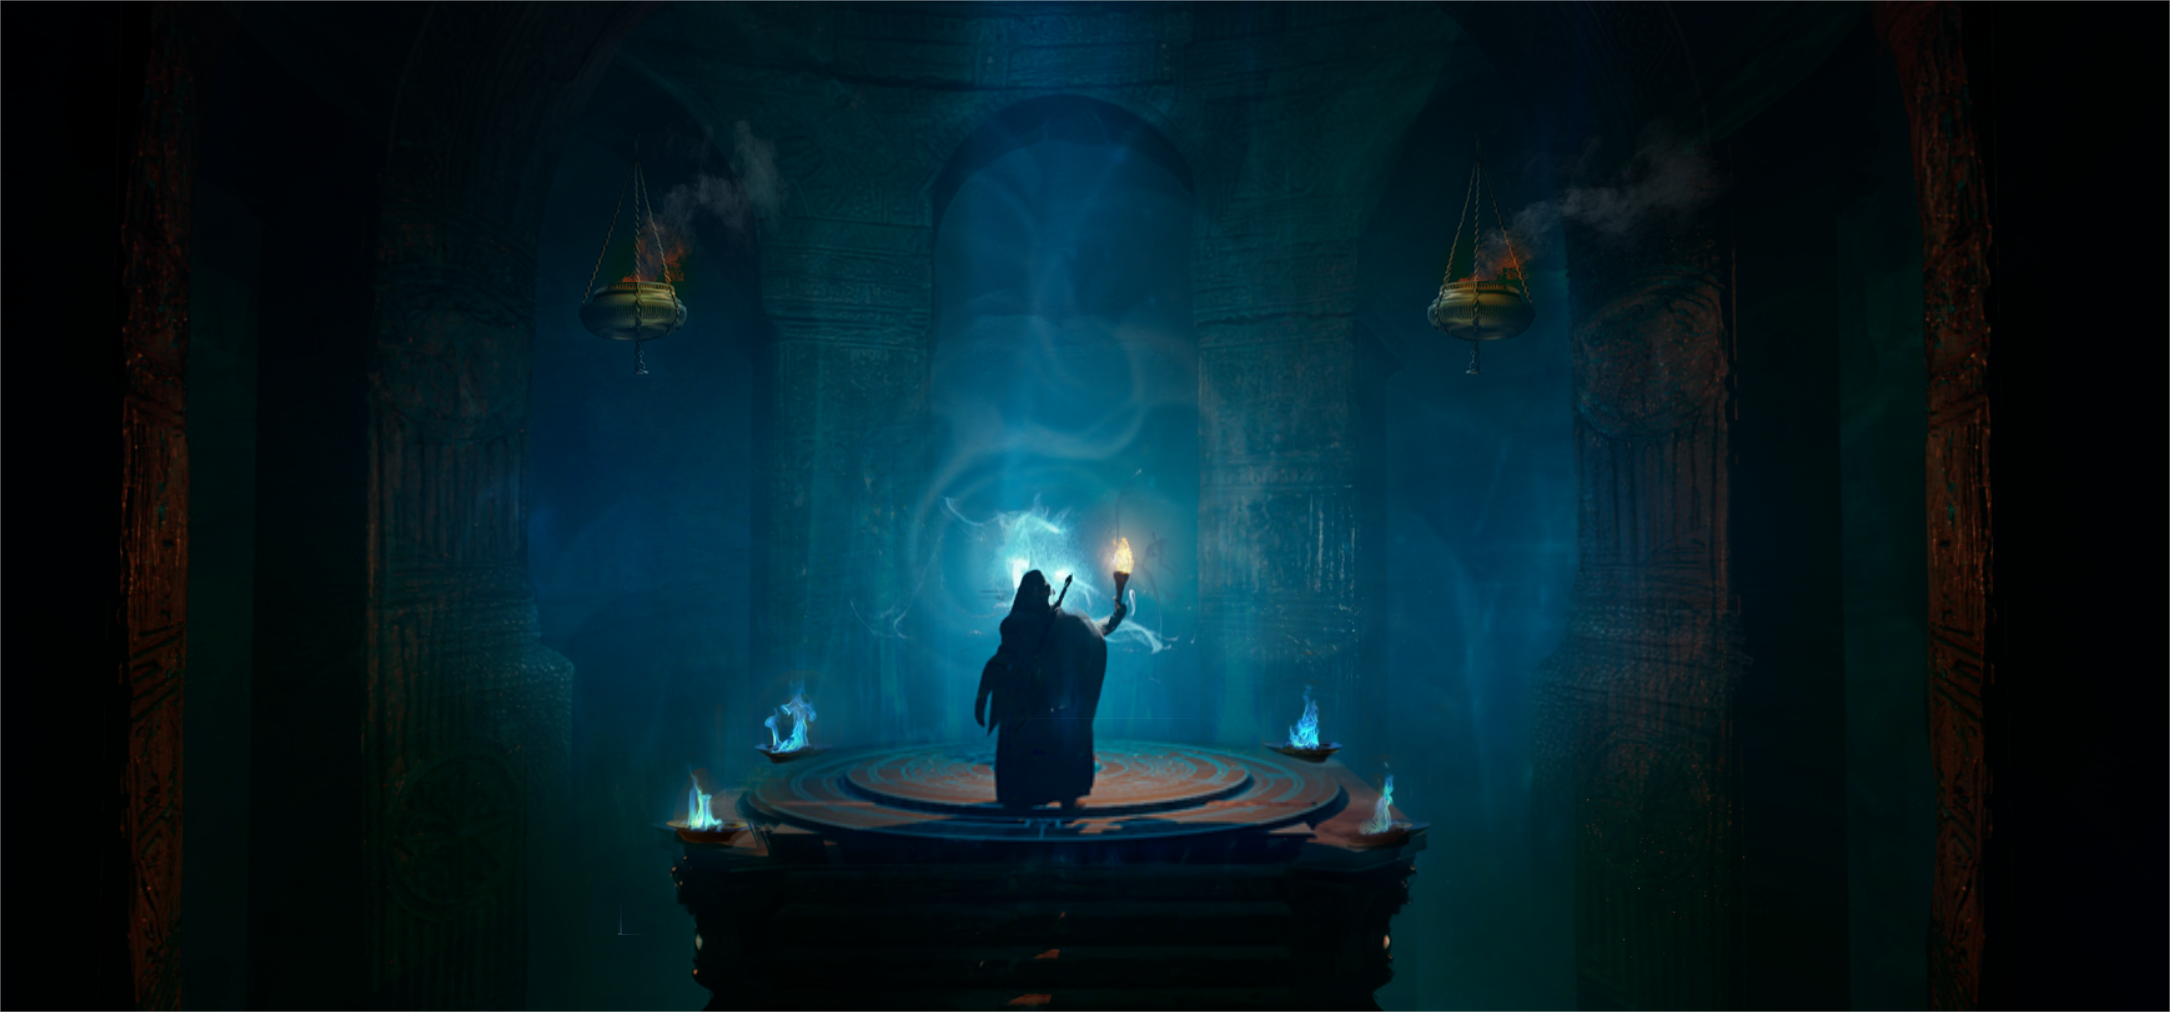


The Chalice Room started simple but felt too flat for key shots. We rebuilt it using Megascans and custom assets, adding depth for a top-down explosion moment. Columns began as cubes, detailed in ZBrush with displaced textures for more dimension within Unreal.
Blocking the Sequence
We used Maya playblasts to build a rough edit focused on timing and performance. Keeping it rough helped the team stay focused on pacing and structure before moving into Unreal. Mocap supported the more complex movements.
video to rough animation with wonderdynamics
Mike (left) filmed timing and weight reference; right shows raw WonderDynamics animation.
We later used WonderDynamics to pull mocap from video, helpful for background actions like soldiers running. It wasn’t perfect, but good enough to block things in. Final animation was hand-keyed by GimbalZen for full control.
FX | Environmental & Character


ANY WIP IMAGERY OF FX WE CAN SHOW? GREYSCALE FX, OR OTHER STUFF LIKE THAT. BEFORE AND AFTERS, OR LIKE IN ENGINE WIP, VS THESE FINAL FRAMES.
We split FX between hero moments and environmental ambience. Key action beats were handled in Houdini for control and detail, while fire, smoke, and embers came from 2D plates composited in DaVinci Resolve.
Unreal’s volumetric FX didn’t hold up in slow motion, flickering and performance issues made them unreliable. While FX were in progress, we continued building out production, which we cover next.
Production – Scene Assembly & Integration
Bringing Assets, Animation, and Lighting Together in Sequencer
Shot 0110, version 7 — lighting and updated Brynhild animation being adjusted in Unreal Sequencer.
By production, the creative direction was locked. This phase was all about integration, lighting, animation, and render quality. All managed through Unreal’s Sequencer by Safari, shot by shot.
Safari handled layout, lighting, timing, comp, and the edit, while vendors refined assets, animation, and FX. As updates came in, they were dropped into Unreal, and Safari adjusted the final edit on a daily basis, catching issues early on.
Michael (director) reviewed daily renders with timecode overlays, while Felix (project consultant) gave weekly feedback with frame-specific notes. Their collaboration with Safari kept pacing tight and visuals aligned with the creative vision from previs through final.
Lighting and Lookdev Across Scenes


The team lit the cinematic with Lumen, using film-style choices to match tone and emotion. Ra had a divine spotlight; the Chalice Room used a glowing core and comped smoke for mood.
Lighting was handled in Sequencer, so adjustments were fast and easy to review in dailies.
Final Animation using Motion Capture and AI Animation Tools
Animation reference (left), mocap cleanup (middle), and shared via StudioLibrary in Maya (right).
Mark Austin (previs supervisor) and Mike (director) filmed reference for key shots, which Jay translated into mocap data. We cleaned and shared the animation using Studio Library in Maya. Ahead of bringing onboard the final animation team. Tools like AnimBot helped us quickly polish without hand-keying from scratch.
Adding Animation Partners for Polish
Side by side showing one shot of previs and how the final animation turned out
Once previs was locked, we contacted Josh Axner at GimbalZen for final animation and rig support. They worked in Maya, shared playblasts through Ftrack, and quickly aligned with our workflow and creative direction.
They used our previs as a base and elevated it, animating every shot and refining subtle moments. Their work helped unify everything just as we moved into post.
Post – Compositing & Final Polish


The team planned for post from the start, so we weren’t scrambling in comp. Safari knew what stayed 3D, what went 2D, and how to blend them in comp.
For animation and FX leads, we focused on polishing only what the camera sees, making smart, story-driven choices. Lighting was used to guide the eye, hiding what didn’t matter and highlighting what did.
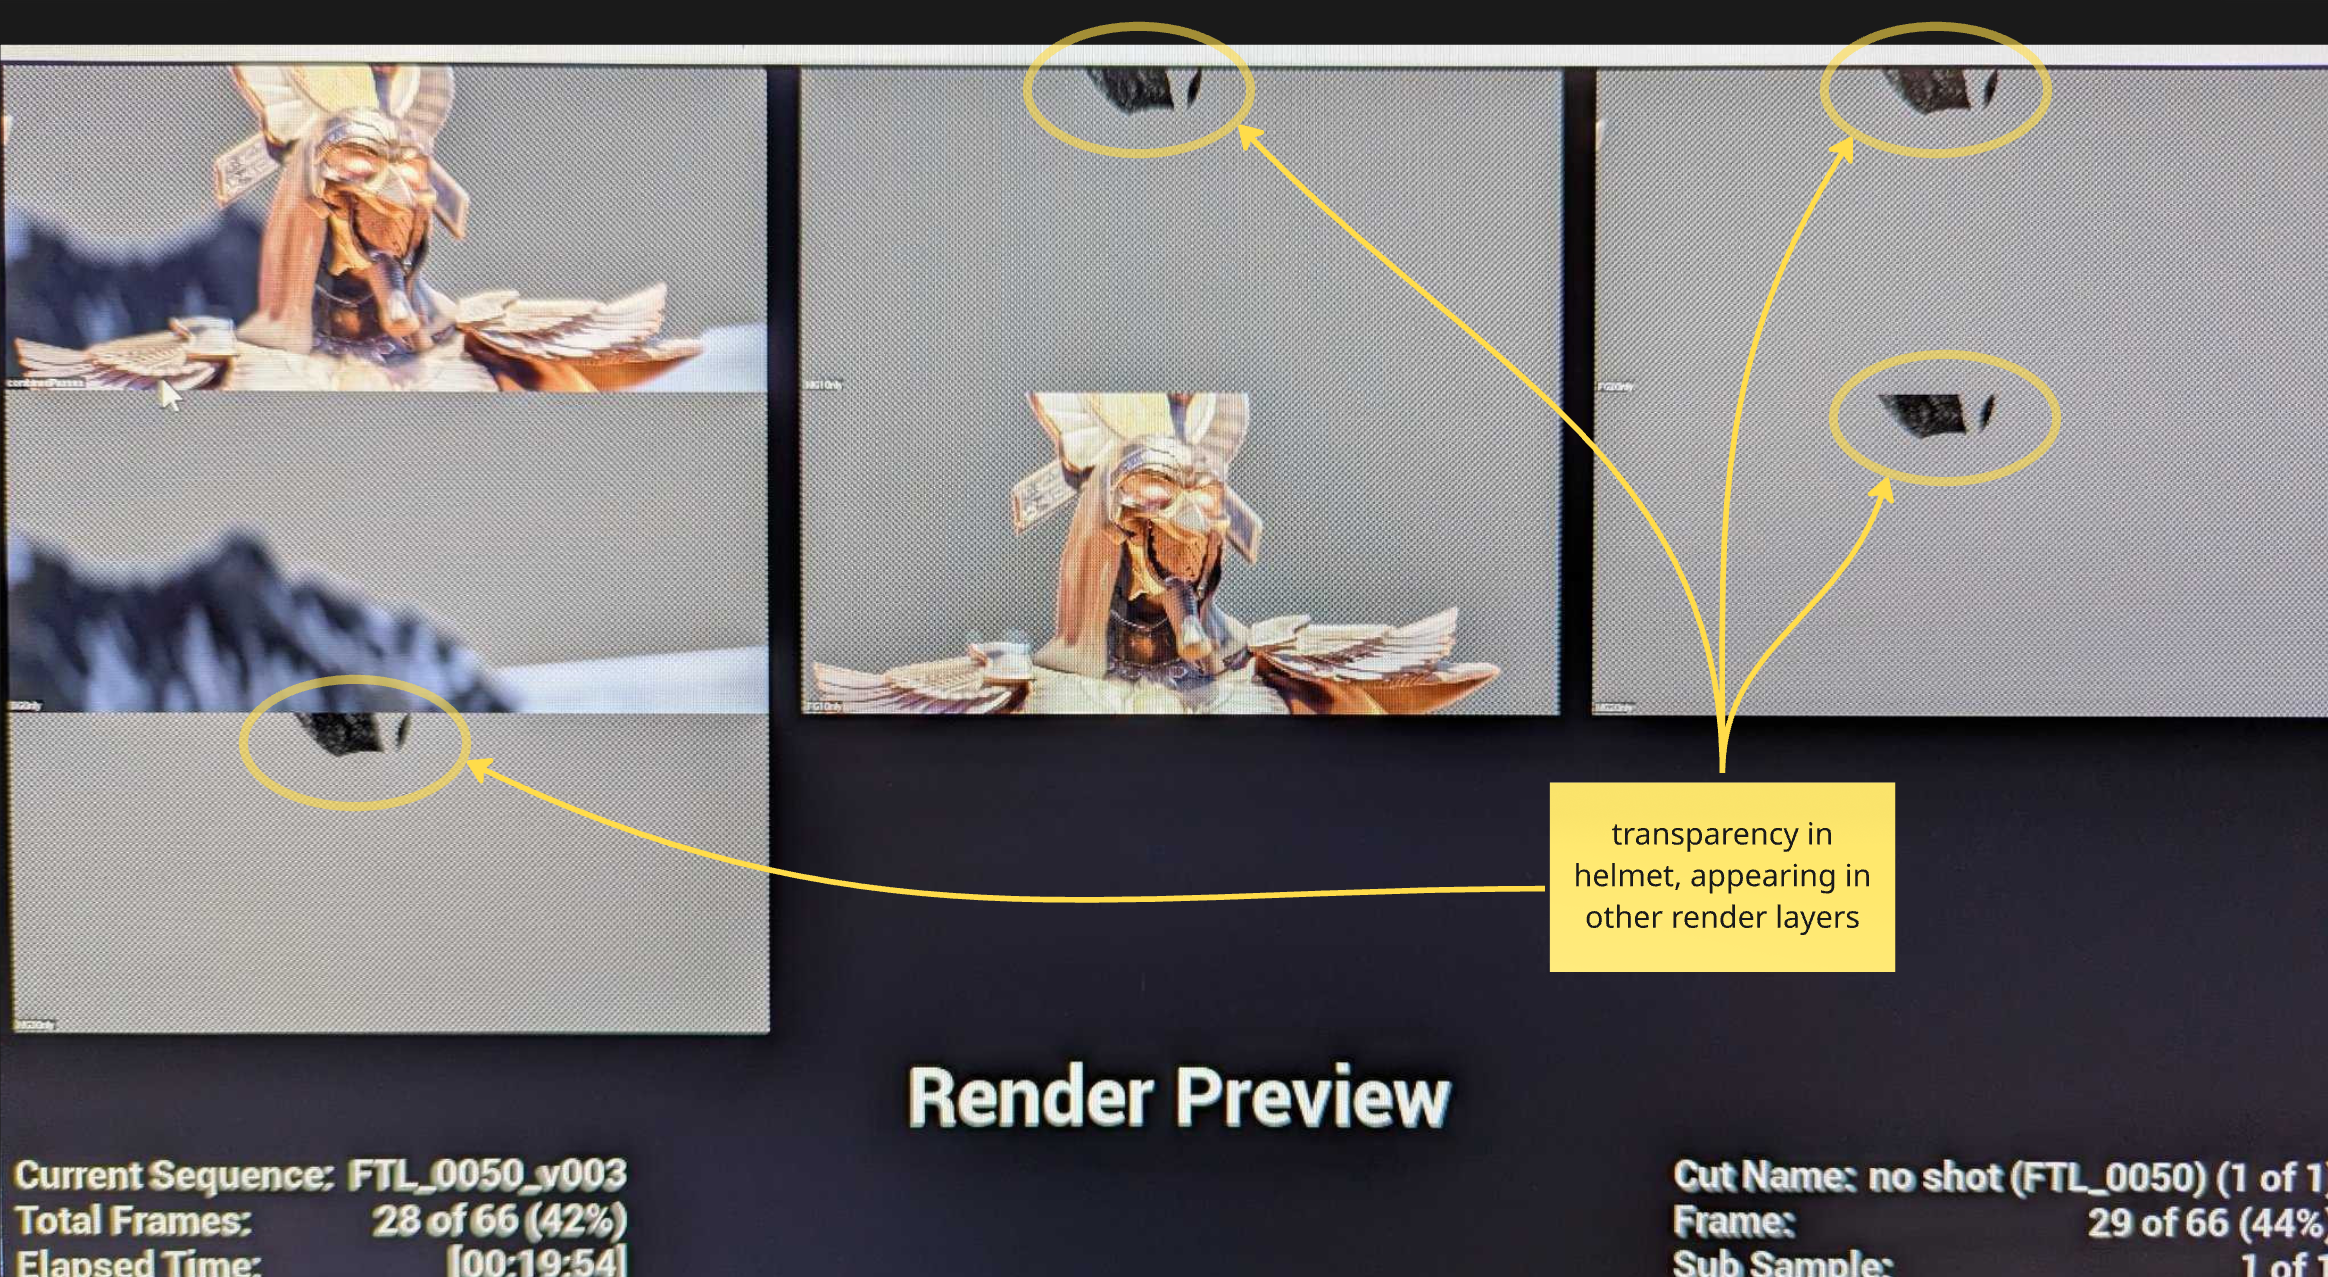
UE5.4’s Movie Render Graph let us batch-render layers efficiently, but still required strategy. We increased temporal samples to reduce ghosting, but only on shots with fast motion. One issue we hit was pixelated alpha channels in shots with deep backgrounds, strangely fixed by placing a cube behind characters to stabilize the render without affecting the comp.
Compositing in DaVinci Resolve
Screengrab of DaVinci Resolve showing 2D fire and smoke on 3D image planes composited over the Unreal Engine render.
Safari imported Unreal cameras into DaVinci Fusion and used them to composite 2D FX on image planes in 3D space, adding parallax, depth, and a sense of volume without full sims. The camera data kept FX properly framed.
Having comp and edit in the same app sped things up. The team could revise, render, and drop shots into the timeline for review within the hour.
We used 2D FX plates in every shot, even layered over Houdini sims. ProductionCrate elements added detail without the need to re-sim, speeding up the process. We definitely love us some Houdini simulations! But they were reserved for character-specific FX, while 2D elements let us mix and match effects wherever they made sense.
Final Edit and Audio
Screengrab of the edit in Davinci Resolve
Safari wrapped the edit with subtle camera shake, lens flares, and final color grading. Music came from the client, and he timed key frames to hit cues. The 1.5-minute cinematic included 27 comped shots with layered FX, delivered in 1080p and 4K. The full 4K render took about 6 - 7 hours to render out of DaVinci Resolve.
With that, the project was complete, but before we wrap, let’s quickly touch on the management process.
Wrap-Up | Few Things We Learned Along the Way
Locking previs early saves time across every department, especially when working with external teams.
Don’t overbuild. Focus on what the camera sees and make intentional lighting and FX choices that serve the shot.
2D FX plates can go a long way, especially when combined with Houdini sims and comp tricks.
Keeping feedback visual and centralized reduces friction and speeds up decision-making.
A lean, well-aligned team can move fast, if communication is clear and ownership is respected.
Use tools and process that match the phase of development you find yourself in. What works in lookdev may not serve you in comp or edit.
Every project is different, but these are the things that kept us moving. Hope they’re useful on whatever you’re building next.
Good day.